
Saturday, February 8, 2014
Friday, August 16, 2013
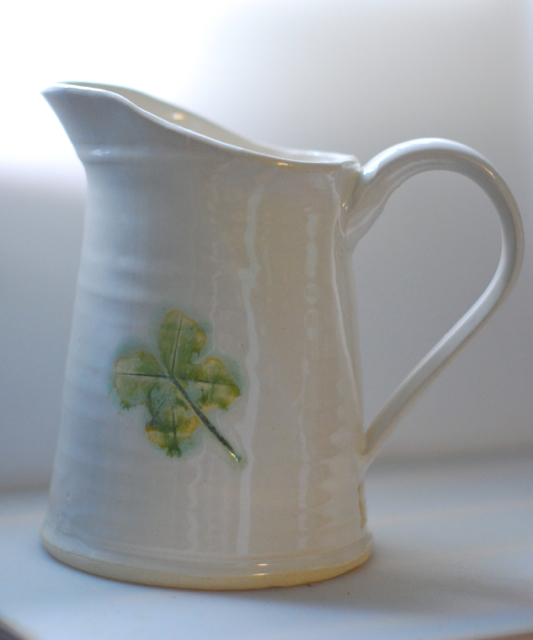
pitcher 29

This is pitcher 29. Sadly, it cracked, so I think I'll hang it outside and fill it with succulents. It's a simple stoneware form, pretty straight sided, and I cut down the base to form the spout. I was moseying around on pinterest one day and saw a beautiful self portrait by Frida Kahlo that was full of flowers- I borrowed these flowers from her. The sugar bowl is one I made to fit this vintage pressed glass top I found in a thrift store box when my sister in law was moving. I liked its shape and wondered if I could make a bottom to fit it. It *almost* fits perfectly. I might go after the base with a sanding tool to make it more secure. Our sugar bowl has seen better days and I'd like to keep it from breaking entirely (it is part of my wedding McCarty pottery stash). Pitchers 30, 31, 32, and 33 are waiting for their bisque fire.

And almost every time I unload a kiln full of porcelain I consider switching to it entirely. I LOVE the stuff. Love love love. I have gotten to the point where I can throw tall forms (thank you, pitcher project!) and I understand what it requires of me in terms of handbuilding (dry very very slowly), but plates are still scary. It is less forgiving, more demanding, but, oh. goodness. This little teacup was a test piece that I'd applied another layer of decoration to, hated, and scraped off. The rim bears evidence of the scraping, but I love it anyway. So far from perfect but still lovely and useful. And maybe better because of its scrappiness. So that may be my 2014 goal- switching to porcelain.
I am having big issues with getting this URL to redirect to my new website, which is up and ready to go except for the URL. I am keeping my etsy shop open and stocked with everything I have (including some special sale pieces coming soon) and will keep it open for certain things but will move others, like this blue and white line (and the speckled egg pieces that I'm going to reintroduce this fall) to the website. This journal will also move over in its entirety (I hope).
Have a lovely weekend, friends.
Friday, August 9, 2013
afoot

This week has seen so much change- I feel almost like my world's spinning like my pottery wheel- but in a good way. New orders, new clients, new opportunities. I just brought home a friend's long-neglected Lockerbyie kick wheel and am setting up an outdoor studio for temperate weather. A new client has requested somewhat rougher/rustic work than what I usually make, and I plan to make it all on the kick wheel. There will be a learning curve, to be sure, but the work will be somewhat more playful and decidedly less pristine than what I usually aim for. I'm excited for the opportunity to stretch my skills.
I also began working on a new comprehensive website this week- a catalog of what I make, an online store (planning to keep my etsy store open, at least for the time being), and I'll be moving this journal of my days making pots over to that space. The url should stay the same, but I hope that the feel, as well as my vision of my work and its progress, will be clearer. There's a learning curve there, too.
Until next week- have a lovely weekend!
Tuesday, August 6, 2013
new new new
School began yesterday and I'm getting my groove back on. Between the obsessive canning of tomato products (salsa, marinara, bbq sauce, plain tomatoes, soup) and list-making for fall business, I'm making plans.
New website
New local shop
New ideas
New styles and products

I always feel like I've got a fresh new start with the new school year. You?
New website
New local shop
New ideas
New styles and products

I always feel like I've got a fresh new start with the new school year. You?
Monday, July 29, 2013
25, 26, 27, 28

Finally, four more pitchers. I was really pleased with this batch.
25- porcelain, thrown, handbuilt spout, carved. I really didn't know what to do with this pitcher when it came time to glaze it but wound up choosing the bucket of "mystery glaze". This is an ever-changing bucket of glaze solids left over from my day's glazing. I wash my brushes in a bowl of water as I'm working and at the end of the session, there is a half-inch or so of glaze sludge at the bottom of the bowl. I mix the water and glaze up and pour it into the 2 gallon bucket, let it settle, scoop out some of the clear water (for the next round of glazing), then mix the resulting glaze with my drill attachment and dip vases, pitchers, bowls into the resulting glaze. This time last year it was a light celadon green, but this year it is a transparent glossy pale blue. Because I am mostly working with white, clear, and aqua glazes right now they form the base, and odd bits of cobalt wash also wind up in the bucket. It's one piece of my sustainability practice. I only wish it were as easy to recycle my clay!
26- also porcelain, thrown, trimmed, and cut away for the spout. Floral mishma decoration that turned out quite well here but I'm not sure I'll use it again. I was working with this sketch-like floral design for wedding platters but they don't work as well as I'd like somehow. Still, this is pretty.
27- front- a shamm, short, squared off stoneware with cascading circles in cobalt mishima. The spout is handbuilt and added when the body was leather hard. This is one of my favorite new patterns.
28- rear- stoneware pitcher, thrown in two pieces. I went back to my love of antique china for this one and added a scalloped border at the top and bottom, painted with cobalt wash. I used the edge of one of my platter templates to make the scallops and will repeat this for my work for the cookbook I'm working on.

This is our last week of "summer". School begins next Monday and we have lots to pack in this week. I'm looking forward to a regular routine and work days again, and being in this space a bit more regularly.
Have a lovely week, friends.
Tuesday, July 23, 2013
developing

Also this summer I've been talking to a good friend, Brian Pera about art, work, working at home, and film. The week N was at camp he came over for the morning while I worked in the studio. I was nervous and reticent to participate, but I'm glad he talked me into making this short film. I shared it last week over twitter and my personal facebook account, but neglected to post it here. Quiet Brain: Melissa Bridgman from Evelyn Avenue on Vimeo.
I hope you enjoy it.
Friday, July 12, 2013

This week my boy has been at camp all week so I feel like I've had so much time to be in the studio- both working and cleaning. I feel like I was really productive and have been so happy to have uninterrupted days. Countdown to school has begun- we start again on Aug 5, so I will be spending the rest of July doing as much fun summer stuff as we can stand, and very little time in the studio.
As promised, here are my chicken tiles. I'm planning to install them on a beam that spans the length of the run from the door to the coop. There's a lot of red with some aqua accents- the faux bois and chicken wire impressions. My favorite tile isn't visible in this shot- a drawing of chicken feet!
And also promised, there's a batch of honey pots in my shop right now.

Have a good weekend, friends!
Monday, July 8, 2013
blue and white party in the studio
On Friday I unloaded my super-full itty bitty kiln to find a veritable blue and white party. I did a lot of work in porcelain a few weeks ago- some cups, three pitchers, some cafe au lait bowls, and a few little pieces to experiment on.
First, a happy little bud vase with a botanical sketch rendered in mishima I drew directly from here. I'll be using this again.
This may be my absolute favorite pitcher from this series. #22, porcelain, thrown in two pieces, and etched with this loopy garland on the bottom and the inside of the top. Happy happy happy. I'll be making many more things like this. Two pictures because I like it so much.
#23, also porcelain, with a much wider strap handle than I usually make. Thrown, altered to a squarish shape and etched with a herringbone pattern at the top. Instead of working with mishima, I watered down my cobalt wash and brushed it over the etched area and the top ice blocking portion that I copied from some of my silver pieces.
#24 porcelain, and I tried to make this a more simple, modern, minimalist shape. it really doesn't work for me but it's fine.
Lastly, a set of 4 honeycomb impression cafe au lait bowls in porcelain and cobalt. I like these a lot. I made them for a friend with whom I trade horticultural knowledge and goods for pottery. I like how simple and happy they are.

Later this week: the new chicken tiles I made and a batch of honeypots. Have a lovely week!
First, a happy little bud vase with a botanical sketch rendered in mishima I drew directly from here. I'll be using this again.
This may be my absolute favorite pitcher from this series. #22, porcelain, thrown in two pieces, and etched with this loopy garland on the bottom and the inside of the top. Happy happy happy. I'll be making many more things like this. Two pictures because I like it so much.
#23, also porcelain, with a much wider strap handle than I usually make. Thrown, altered to a squarish shape and etched with a herringbone pattern at the top. Instead of working with mishima, I watered down my cobalt wash and brushed it over the etched area and the top ice blocking portion that I copied from some of my silver pieces.
#24 porcelain, and I tried to make this a more simple, modern, minimalist shape. it really doesn't work for me but it's fine.
Lastly, a set of 4 honeycomb impression cafe au lait bowls in porcelain and cobalt. I like these a lot. I made them for a friend with whom I trade horticultural knowledge and goods for pottery. I like how simple and happy they are.
Later this week: the new chicken tiles I made and a batch of honeypots. Have a lovely week!
Tuesday, July 2, 2013
high summer
we've hit a blissfully cool spell this week- yesterday's highs were in the 70s, today's, low 80s. So it was a very good time to suit up (and I'm so glad that I did!) and go into the beehive to fix some messy situations I'd observed from the window and then a big huge mess at the front of the hive. Top bar hives are supposed to be REALLY good for the bees. More like natural cavity hives, good for bee health and population growth. Not so good for honey harvest, because sometimes the combs are built in a crossing, intersecting pattern, especially if they are near full honeycombs that are big and fat, broaching into territory that is meant for other combs. So I knew I had work to do.
In the photos below, you'll see a straight, perfect comb. The hive was full of these. And next to it, a bowl of uncapped honeycomb that was built perpendicular to its surrounding combs. I cut these out and preserved the straight combs. There was one section that had 3 honeycombs fused together at the back of the hive. I left those and marked them so I'd know not to move them, but could let the bees eat them. After I removed the crossed combs and combs that were fat on one end, skinny on the other, I alternated these straight combs with empty bars to encourage the bees to build new straight combs. One doesn't really reason with bees, but this was my attempt. The uncapped honey doesn't keep but ferments easily, so I will either use this immediately (ice cream?) or give it to a friend who makes mead.

Above, you see the brood comb. I was happy to see lots of larvae, capped brood, and eggs. I checked three frames but didn't go back further than that. There was plenty of cleanup at the front, some of which I harvested, some of which I set aside for the bees to clean up and reuse. Lastly, you see my half-gallon jar, filled with chunks of capped honey, which I then crush and strain. The cleanup at the front of the hive was quite intense, and the bees were less than happy with me. I was grateful that I'd accidentally ordered a full suit instead of just a jacket. They were ready to sting, but so far, the suit's kept me sting free.
My garden is going- tomatoes coming in. Ajax enjoys the unripe roma tomatoes a little too much (he, incidentally, is never allowed to be outside while I'm working with the bees. He is curious and looks too much like a small brown bear for his own good), and the yellow pear tomatoes have all succumbed to wilt. I have pulled them out and will replace them with pole beans and cucumbers for the rest of the season.
Later this week I'll show you a) pitchers and b) a tile project I've been working on in preparation for the first city-wide Coop Tour in Memphis.
Have a lovely week and a happy Independence Day, friends!
Tuesday, June 25, 2013
half way point
this week marks week 26 of my pitcher project. Pitchers 22, 23, 24 are in the kiln. 25 is on the drying shelf because a) I forgot I'd left it in the damp box and b) it wouldn't have fit in the little kiln anyway. I've given away two pitchers, #3 to my mother for mother's day and #7 to a friend who, quite simply, needed it.
Here are the other 19:

I am still toying with the idea of showing these as a group next year. After that point, they'll (almost) all be for sale, either at the showing or in my shop. Not sure yet.
This morning I went to one of the local shops that carries my work and did a refresh and swap out. Later this week I'll list some of the things I brought home in a sale section in my shop. And hopefully I'll glaze the other pitchers and have them to show you, as well.
Thursday, June 20, 2013
seven
just listed in the shop! and I'm bisque firing honeypots early next week, glazing Weds or so. They'll be listed shortly thereafter.
hello Thursday!

Tuesday, June 18, 2013
blue and white/ 21
I am feeling extremely unmotivated to work these days. Extremely. Not good for the self-employed.
There are ideas swimming around in my head, but not coming out in the studio. Pressing on, wanting to or not.
Here are some pieces from my last kiln load that I was happy with:

 And pitcher 21. I'm still making them, but I'm a bit behind. This is week 25 and I just finished pitcher 22 yesterday. So today, 23, 24, 25. This clay is a leftover piece from my faux bois platters that I rewedged with some fresh clay, so there is some slight blue marbling here and there. I like the forthright shape and precise design blended with the running blue and marbling.
There are ideas swimming around in my head, but not coming out in the studio. Pressing on, wanting to or not.
Here are some pieces from my last kiln load that I was happy with:

First, a set of blue and white tumblers. Plain creamy stoneware, etched designs, cobalt inlay. There is also this one, but the clover is a smidge too dark. The think I like best about this cup is the smeary edges that came from glazing immediately after I applied the wash, not giving it time to dry properly. The floral pattern, which you see repeated below, is the same one I lifted from the vintage bird platter I bought at an estate sale last summer. I do like combining the traditional china decorating imagery with more abstract, subtle designs. And the cascading blue circles is just about my favorite of the bunch. These blue and white pieces will show up again, but I'm holding them back for a while.
 And pitcher 21. I'm still making them, but I'm a bit behind. This is week 25 and I just finished pitcher 22 yesterday. So today, 23, 24, 25. This clay is a leftover piece from my faux bois platters that I rewedged with some fresh clay, so there is some slight blue marbling here and there. I like the forthright shape and precise design blended with the running blue and marbling.
Later this week: I have berry bowls to list! I'll post here once they're up. Have a good week, y'all.
Friday, June 14, 2013
friday to friday
and they're finished. the bottom broke off of one in the kiln- not quite blew up, but not intact.
watery, yes?

watery, yes?

I think he'd be happy. I layered so many glazes and raw cobalt that you can't really even see the mississippi river slip, but I'm glad it's there. Not my style, but I think they feel peaceful, and I hope they bring peace.
Friday, June 7, 2013
urns
Last year I had a conversation with one of my oldest friends about making an urn for her, when the time comes. She wanted an unfired piece that would return to the earth along with her ashes. Later that summer, I made an urn for a college friend for her mother. Then, when my dear friend Papatya died, I made several small urns for her family to divide her ashes. Since then I've made several pet urns, including one for my Birdy. I was happy to make them, especially in small sizes, for pets. Much less happy to make Papatya's, but glad that I could.
Saturday we received a phone call that our son's best friend lost his father. It was very sudden, and we were all very sad. When his son, who is much like my own son, told me that his father wanted his ashes sprinkled at the Mississippi River, I offered to make a keepsake urn for his family. His wife, who is also a good friend, requested a water/river theme. Her husband grew up on the water near Boston and loved running on the river here as a young man.

This week I threw three large lidded vessels and yesterday after I trimmed them I began thinking about River. Rivers defy precision. They aren't necessarily neat and tidy- a little wild, untamed. I brushed iron oxide-heavy slip that I made from the clay I dug from the banks of the Mississippi on each of the pieces and let them run a bit. The gray color you see here is a cobalt wash. I plan to coat the pieces in a sheer blue to let the darker colors come through. Working this loosely is a challenge for me, but I'm excited to see how they turn out and which piece the family will choose.
I'm honored to make this for his family and also glad that urns are not my main product line.
I didn't make a pitcher this week, so next week will be a 2 pitcher week.
Hope you all have a good weekend.
Monday, June 3, 2013
pitchers again! 17-20
17- red mishima- I love the ticking at the top and bottom. red and white and blue and white just make me really happy. clean and crisp.


19- one single four leaf clover, white glaze. tall-ish pitcher.
 20- I love this one. I took the scrap from my cobalt faux bois pieces and wedged it to reuse, which caused the marbled blue streaks throughout the pitcher. It's a small, chunky milk-type jug with mishima bees and honeycomb.


18- hand-painted cobalt stripes. my cobalt is a mix of cobalt oxide, frit (I think), and water. cobalt is so intense, it rubs off on everything. I think that I need to add some gerstley borate to stabilize it a little. this reminds me of rough mediterranean tourist earthenware pottery.

19- one single four leaf clover, white glaze. tall-ish pitcher.

Friday, May 31, 2013
progress
this year I've been working towards a lot of different things, including streamlining what I make (more in terms of finishing and surface design than forms), expanding my repertoire, and looking at the best way(s) to grow my business. Here's some of what I've been working on lately:

cake stands- I used to throw these in two pieces, but they'd slump or come apart. Frequently. It was really frustrating. I've learned how to throw them in a single piece and they're doing much much better. Still refining this form, but I'm happier with these and their potential than I was with the others I used to make. Jeanette has made seemingly (possibly literally) HUNDREDS of cake stands this spring. She's been a huge inspiration in my relearning cake stands. There are still some ticky little things I'm not happy with, but I like the direction I find myself moving.
faux bois- the response to these has been overwhelming- both online and in person. I can't say that these will be a huge part of my lineup, but right now it's fun and fresh and helps me to crank out more of the same old forms.
pet urns- I think I've finally settled on the appropriate sizes and prices for these. I've made some test pieces and have a few more to make, but they're coming. For dogs AND cats.
I am still working on pitchers, but I've been so busy with work and life that I haven't taken photos of the last three or four. This weekend.
Lastly, if you're local, I'll be at the Overton Park Day of Merrymaking next Saturday. I'll be sharing a booth with Sweaterlove.
Monday, May 20, 2013
planning
last week completely got away from me. The pitchers are in the kiln (one or two, that is), and I have several other pitchers in various states of being made or fired or completed. I am working towards a festival in Overton Park in lieu of a home sale this spring/summer, trying to keep my retailers stocked, and working on the planning and experimenting stages for a really big project.
 When Gary and I got married in 2000, I had already begun a collection of blue and white dishes. Some old blue willow, spode, asian-import bowls, an antique set of wedgwood. I loved to mix and match the very old and fancy with mass-produced transferware and heavily mass produced restaurant ware, all unified by their blue and white color scheme. Many of these are still my every day dishes, and I've begun adding my own blue and white pieces to the set.
I'm working on a new idea, combining the more traditional floral (and bee!) patterns I played with heavily in 2012 and mixing them with more abstract, organic, geometric blue and white renderings. Sometimes in the same piece, sometimes in coordinating pieces. I'm very excited about this project and will have some pieces up in the shop and locally, but I am keeping most of these back until the new year.
Fifty percent of my making time has been filling orders and making many of the same things I've always made (but I am dropping a few things here and there), and fifty percent is dedicated to R and D mode. I hope, at the end of this year, that I'll have a more unified body of work to streamline my making, my supplies, and my time. Refining has been my underlying goal for this year, and I'm beginning to see things that I like.
Hope y'all have a good week this week. School ends for us on Wednesday. I am not ready!
Monday, May 13, 2013
bees, take 3
On Thursday, I went to check on my bees and was a little alarmed to see that they had taken up almost ALL of the available space in the hive. Saturday morning, I let the dog out and noticed a dark blot in the very top of my fig tree. About 20 feet up. I got out the binoculars (closer at hand than my glasses) and gasped to see this:
 This swarm was about three times the size of the swarm I'd captured in March. I guessed that they'd come from my over-full hive, and a quick check through the window showed that it was still quite full, but not so full of bees that I couldn't see the comb. I sent my bee mentor an email, and within an hour, Richard was over with his swarm capturing equipment. We got the bees, but it took almost 2 hours.
After we knew we'd gotten the queen, we checked on my hive. Richard explained that the old queen leaves the hive with 60% of the worker bees when they swarm. Typically, they do this after they've capped several new queen cells, which you see here:

That peanut-shaped bump is a queen cell, filled with royal jelly and bee larvae. To the right, you see some raised bumps, which are drone brood, and the flat capped cells are worker brood. We found five capped queen cells, plus several other empty queen cups. Because Richard raises queens, I had him take three of the five capped queen cells back to his apiary. In another few days, the new queens will emerge, determine which queen will be queen (it's a death-fight), then take her mating flight. After that flight, she'll spend the rest of her life inside the hive, laying eggs. Unless, of course, the colony outgrows its space and they swarm, in which case she will leave with 60% of her colony and begin again.
Because my intention with beekeeping is increasing bee health and the bee population, I'm happy to see my colony grow and divide like this. If I were keeping bees for honey, swarming would mean less honey for me to harvest, but that's secondary.
Interestingly, late Saturday afternoon I got an email from Rebecca detailing her family's swarm adventure. Seems to be the season!
Later this week: more pitchers and maybe some mishima.
Have a lovely week!
Thursday, May 9, 2013
14, 15, 16

pitcher 14. inspired by this. I made a chrysanthemum-type stamp years and years ago and pressed it into the not-quite leather hard clay, then brushed low fire blue glaze over it before I bisque fired. I don't remember if I tried to wipe it off or not (but I think I may have). I coated it in clear gloss before firing to ^6. My favorite things about it are my finger marks on the inside and the almost ikat streakiness of the blue on the handle.

#15 is an upsized version of a creamer that I made before Christmas and my friend Brian has. Sadly, when I was moving it to bisque fire, I knocked the handle off, and some chunks of the rim. Because it was still green (unfired), I got the pieces wet and stuck them back together. So it has a bit of a "make do and mend" quality to it. I have to say that while I was disappointed that I broke this piece, the mending is my favorite part of it.

#s 17 and 18 are ready to glaze and I threw #19 yesterday. time flies!
Thanks for reading, friends.
Tuesday, May 7, 2013
faux bois
In mid April, while trolling pinterest, I found this tutorial on making faux bois. I'd seen one eons ago on the old martha stewart show about using a faux finishing woodgrain paddle on a slab and throwing it on a wedging table to stretch it out (I believe Jeff Bridges was demonstrating? who knew the Dude was a pottery person? And completely aside, I have a lot of respect for his humanitarian work- he really makes a difference). I was in a slump and needed to do something to spark my creativity (and to get back to work), so I shook up my bottle of cobalt wash, rolled out a thick slab, and went to work. Here are the results:

The platter in the foreground is very rough/rustic. It was the first slab and I didn't trim it at all, just laid it into a mold*. I think I'm going to use it outside on my porch. The second slab became the four dessert plates to the right. In the background is the last slab I made, and I cut it to fit an oval platter form I have. I took the leftover bits of clay and rewedged them to throw with. I hope that there will be some cobalt marbling in the finished piece, but I didn't see anything as it dried. We'll see!
I'm going to try this with my Mississippi River clay slip, as well, and see how that works. I'm not sure this is something that I'll make a lot of, but it was a fun diversion.
Tomorrow I'll be back here with pitchers!
*speaking of molds, all of my molds are platters, plates, trays that I've found in thrift stores, antique/junk shops, and occasionally I'll splurge on the melamine trays they bring out at target every spring. They have some great shapes that I haven't seen elsewhere, but I'd admit that my favorites are the small ceramic pieces I pick up at thrift stores for a song.
Subscribe to:
Posts (Atom)